发布 JAR 包到 Maven 中央仓库

Sonatype OSSRH (OSS Repository Hosting) 提供了 JAR 包发布服务,并支持自动将 JAR 包同步到 Maven 中央仓库,所以我们将 JAR 包发布到 Sonatype OSSRH 即可。

创建 Sonatype 工单

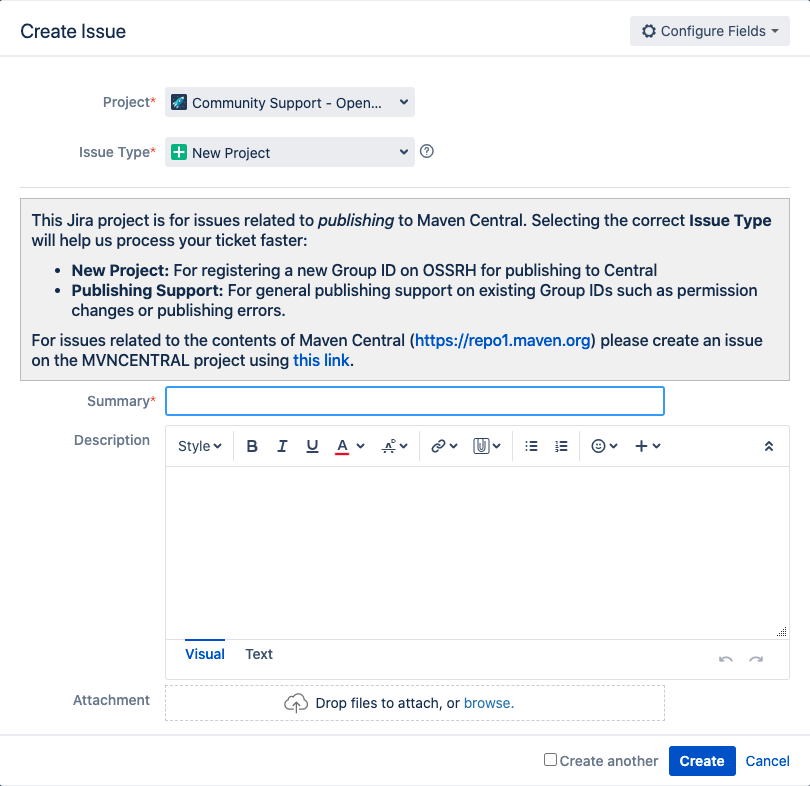
第一步在 Sonatype 上注册一个账号,创建成功后在上面创建一个 IssueProject 选择 Community Support - Open Source Project Repository Hosting (OSSRH)Issue Type 选择 New Project

alt

这里要注意的是 Group Id 的填写,根据 Coordinates 的描述,这里分两种情况:

  1. 你拥有某个域名,如 example.com
  2. 你没有域名,但是你的代码托管在了某个代码托管服务上,如 GitHub

对于第一种情况,你的 Group Id 可以是任何以 com.example 为前缀的字符串,如 com.example.myawesomeproject。不过,Sonatype 会要求你证明确实拥有 example.com 域名,你需要在你的域名注册商那创建一条 TXT 记录,其内容就是你创建的 Issue 的工单号,如 OSSRH-12345,具体步骤可参考 How do I set the TXT record needed to prove ownership of my Web Domain?

对于第二种情况,以 GitHub 为例,你的 Group Id 必须是 io.github.myusernamemyusername 是你的 GitHub 账户名或者是组织名,类似的,为了证明你对 myusername 的所有权,你需要在 myusername 下创建一个公开的仓库,仓库名称为你所创建 Issue 的工单号,如 OSSRH-12345,认证完成之后你就可以删掉这个仓库。Sonatype 所支持的代码托管服务如下:

Service Example groupId
GitHub io.github.myusername
GitLab io.gitlab.myusername
Gitee io.gitee.myusername
Bitbucket io.bitbucket.myusername
SourceForge io.sourceforge.myusername

工单示例可参考 Publish my open source java package

安装 GPG

GPG 用于对所发布的包进行签名,在 GnuPG 根据自己的操作系统下载 GPG 安装包,安装完成后执行 gpg --full-gen-key 生成秘钥对,选择默认选项即可,生成秘钥对时会要求输入姓名、邮箱、注释和密码,其中密码在发布阶段会用到,秘钥生成信息类似如下:

1
2
3
4
pub   rsa3072 2022-02-26 [SC]
E892F685E5EA9005E0A2DE31F0F732425A15D81D
uid examplename <examplename@example.com>
sub rsa3072 2022-02-26 [E]

其中 E892F685E5EA9005E0A2DE31F0F732425A15D81D 是秘钥的 ID,然后我们需要将公钥分发到公共的秘钥服务器上,这样 Sonatype 就可以通过这个公钥来验证我们所发布包的签名是否正确:

1
gpg --keyserver keyserver.ubuntu.com --send-keys E892F685E5EA9005E0A2DE31F0F732425A15D81D

这里选择的公共秘钥服务器是 keyserver.ubuntu.com,也可以选择其他服务器,如 keys.openpgp.org 或者 pgp.mit.edu

配置 settings.xml

为了将包发到 Sonatype OSSRH,需要在 Mavensettings.xml 中配置用户信息,即在 servers 下添加如下信息,这里的 your-jira-idyour-jira-pwd 对应第一步创建的账号和密码:

1
2
3
4
5
<server>
<id>ossrh</id>
<username>your-jira-id</username>
<password>your-jira-pwd</password>
</server>

另外,为了在打包时对文件进行签名还需要在 profiles 下添加如下信息,这里的 the_pass_phrase 为生成 GPG 秘钥时设置的密码:

1
2
3
4
5
6
7
8
9
10
<profile>
<id>ossrh</id>
<activation>
<activeByDefault>true</activeByDefault>
</activation>
<properties>
<gpg.executable>gpg</gpg.executable>
<gpg.passphrase>the_pass_phrase</gpg.passphrase>
</properties>
</profile>

配置 pom.xml

最后是配置 pom.xml,首先我们需要告诉 Maven 将包部署到 Sonatype OSSRH,需要增加一个 nexus-staging-maven-plugin 插件:

1
2
3
4
5
6
7
8
9
10
11
12
13
14
15
16
17
18
19
20
21
<distributionManagement>
<snapshotRepository>
<id>ossrh</id>
<url>https://s01.oss.sonatype.org/content/repositories/snapshots</url>
</snapshotRepository>
</distributionManagement>
<build>
<plugins>
<plugin>
<groupId>org.sonatype.plugins</groupId>
<artifactId>nexus-staging-maven-plugin</artifactId>
<version>1.6.7</version>
<extensions>true</extensions>
<configuration>
<serverId>ossrh</serverId>
<nexusUrl>https://s01.oss.sonatype.org/</nexusUrl>
<autoReleaseAfterClose>true</autoReleaseAfterClose>
</configuration>
</plugin>
</plugins>
</build>

然后是配置 Javadoc 和源码插件,如果最后的 JAR 包没有包含 Javadoc 和源码,Sonatype 会不允许通过:

1
2
3
4
5
6
7
8
9
10
11
12
13
14
15
16
17
18
19
20
21
22
23
24
25
26
27
28
29
30
<build>
<plugins>
<plugin>
<groupId>org.apache.maven.plugins</groupId>
<artifactId>maven-source-plugin</artifactId>
<version>2.2.1</version>
<executions>
<execution>
<id>attach-sources</id>
<goals>
<goal>jar-no-fork</goal>
</goals>
</execution>
</executions>
</plugin>
<plugin>
<groupId>org.apache.maven.plugins</groupId>
<artifactId>maven-javadoc-plugin</artifactId>
<version>2.9.1</version>
<executions>
<execution>
<id>attach-javadocs</id>
<goals>
<goal>jar</goal>
</goals>
</execution>
</executions>
</plugin>
</plugins>
</build>

不过上述配置不适合 Kotlin 项目,会提示 Missing: no javadoc jar found in folder '/com/example/username/awesomeproject',需要将 maven-javadoc-plugin 替换为 dokka-maven-plugin

1
2
3
4
5
6
7
8
9
10
11
12
13
14
15
16
17
<build>
<plugins>
<plugin>
<groupId>org.jetbrains.dokka</groupId>
<artifactId>dokka-maven-plugin</artifactId>
<executions>
<execution>
<phase>package</phase>
<id>attach-javadocs-dokka</id>
<goals>
<goal>javadocJar</goal>
</goals>
</execution>
</executions>
</plugin>
</plugins>
</build>

最后,剩下补充一些元数据,这个也是必填项,包括:

  • 项目名称,描述和地址
  • 许可证信息
  • 开发者信息
  • 源码地址

完整的示例可参考:

1
2
3
4
5
6
7
8
9
10
11
12
13
14
15
16
17
18
19
20
21
22
23
24
25
26
27
28
29
30
31
32
33
34
35
36
37
38
39
40
<?xml version="1.0" encoding="UTF-8"?>
<project xmlns="http://maven.apache.org/POM/4.0.0"
xmlns:xsi="http://www.w3.org/2001/XMLSchema-instance"
xsi:schemaLocation="http://maven.apache.org/POM/4.0.0 http://maven.apache.org/maven-v4_0_0.xsd">
<modelVersion>4.0.0</modelVersion>

<groupId>com.simpligility.training</groupId>
<artifactId>ossrh-demo</artifactId>
<version>1.0</version>
<packaging>jar</packaging>

<name>ossrh-demo</name>
<description>A demo for deployment to the Central Repository via OSSRH</description>
<url>http://github.com/simpligility/ossrh-demo</url>

<licenses>
<license>
<name>The Apache Software License, Version 2.0</name>
<url>http://www.apache.org/licenses/LICENSE-2.0.txt</url>
</license>
</licenses>

<developers>
<developer>
<name>Manfred Moser</name>
<email>manfred@sonatype.com</email>
<organization>Sonatype</organization>
<organizationUrl>http://www.sonatype.com</organizationUrl>
</developer>
</developers>

<scm>
<connection>scm:git:git://github.com/simpligility/ossrh-demo.git</connection>
<developerConnection>scm:git:ssh://github.com:simpligility/ossrh-demo.git</developerConnection>
<url>http://github.com/simpligility/ossrh-demo/tree/master</url>
</scm>

...

</project>

发包

执行 mvn clean deploy 即可发包,如果执行成功,在提交的工单中会自动增加一条回复:

Central sync is activated for com.example.awesomeproject. After you successfully release, your component will be available to the public on Central https://repo1.maven.org/maven2/, typically within 30 minutes, though updates to https://search.maven.org can take up to four hours.

也就是30分钟内即可从 Maven 中央仓库下载 JAR 包,不过要想能在 search.maven.org 搜索到你的 JAR 包,需要等待至多4个小时。

另外,因为配置 nexus-staging-maven-plugin 时指定了 autoReleaseAfterClosetrue,所以发包后不需要去 https://oss.sonatype.org/#stagingRepositories 手动执行 closerelease 操作。

参考