MIT 6.824 - MapReduce: Simplified Data Processing on Large Clusters
介绍
MapReduce: Simplified Data Processing on Large Clusters 是 6.824: Distributed Systems 中所介绍的第一篇论文。它提出了一种针对大数据处理的编程模型和实现,使得编程人员无需并行和分布式系统经验就可以轻松构建大数据处理应用。该模型将大数据处理问题拆解为两步,即 map 和 reduce,map 阶段将一组输入的键值对转化为中间结果键值对,reduce 阶段对中间结果键值对按照相同的键进行值的合并,从而得到最终的结果。
背景
对于 Google 来说,每天运行的系统会产生大量的原始数据,同时又要对这些原始数据进行加工产生各种衍生数据,虽然大部分数据加工的逻辑都较为简单,然而由于数据量过于庞大,为了在合理的时间内完成数据处理,通常需要将待处理的数据分发到几百或几千台机器上并行计算,这就存在几个问题:
- 如何使计算可并行
- 如何分发数据
- 如何处理异常
如果每一个数据加工任务都需要独立去解决上述的问题,一方面会使得原本简单的代码逻辑变得庞大、复杂和难以维护,另一方面也是在重复工作。受 Lisp 等其他函数式编程语言中的 map 和 reduce 函数的启发,Google 的工程师们发现大部分的数据处理遵循如下的模式:
- 对输入的每一条数据应用一个
map函数产生一组中间结果键值对 - 对中间结果键值对按照相同的键聚合后,应用
reduce函数生成最终的衍生数据
因此,Google 的工程师们抽象出了 MapReduce 框架,使得应用开发人员可以专注于计算逻辑实现而无需关心底层运行细节,统一由框架层处理并行、容错、数据分发和负载均衡等系统问题。现在再来看前面提到的问题是如何解决的:
- 如何使计算可并行:在
map阶段,对数据分发后,各任务间无依赖,可并行执行;在reduce阶段,不同key的数据处理间无依赖,可并行执行 - 如何分发数据:在
map阶段,可按执行map任务的节点数量平均分发(这只是一种可能的策略,具体分发策略见后文描述);在reduce阶段,可按key相同的数据聚合后分发 - 如何处理异常:重新执行某个节点上失败的
map或reduce任务作为首要的容错手段
编程模型
假设需要统计一组文档中每个单词出现的次数,在 MapReduce 框架下用户需要编写 map 和 reduce 函数,近似的伪代码表示如下:
1 | map(String key, String value): |
假设有两个文档 hello.txt 和 world.txt,其内容分别为:
1 | hello.txt: |
对上述 map 和 reduce 函数来说,map 函数每次处理一个文档,key 为文档的名称,value 为文档的内容,即:
1 | map("hello.txt", "It was the best of times") |
map 函数执行时会遍历文档的内容,对每个单词输出中间结果键值对(作为示例,这里省去了将文档内容拆分为单词的过程,同时也忽略了标点符号、大小写等与示例无关的内容),键为单词,值为 "1",所有 map 函数执行完成后生成的中间结果为:
1 | hello.txt: |
然后,MapReduce 框架对所有中间结果按照相同的键进行聚合,即:
1 | it ["1", "1"] |
最后,MapReduce 框架将上述聚合后的数据分发给 reduce 函数执行,即:
1 | reduce("it", ["1", "1"]) |
reduce 函数执行时会遍历 values,将每个字符串转换为整型后累加,然后作为 reduce 的结果返回,最终得到所有单词出现的次数:
1 | it 2 |
实际执行 reduce 函数时,并不会将 values 一次性传给某个 reduce 函数,因为有可能数据量太大无法完全载入内存,所以 values 在实现时是个迭代器,reduce 函数能以流式的形式获取值。
另外,虽然在上述的例子中 map 和 reduce 处理的都是字符串类型的数据,但是也可以支持其他类型的数据,map 和 reduce 处理的数据类型遵循如下的模式:
1 | map (k1, v1) -> list(k2, v2) |
可以看到,map 产生的中间结果的数据类型和最终结果的数据类型是一致的。对整个框架来说,最初的输入和最终的输出都是某种形式的字节流或字符串,因此在 Google 的 C++ 实现中,提供了专门的数据转换接口,用户可实现该接口用于字符串和 map、reduce 需要的数据类型之间转换。
实现
MapReduce 的具体实现视硬件环境的不同而不同,论文中描述的实现是针对 Google 内部广泛使用的硬件环境,即通过交换以太网相连的大量廉价 PC 组成的集群:
- 每台机器的配置一般为双核
x86处理器,2-4 GB内存,运行Linux系统 - 使用廉价网络硬件,带宽一般为
100 Mbit/s或1 Gbit/s,不过平均来说会小于bisection bandwidth(bisection bandwidth指当某个网络被分成两部分时,这两部分间的带宽) - 一个集群一般由几百上千台机器组成,所以机器异常是家常便饭
- 存储使用的是廉价的
IDE硬盘,并直接装载到了机器上。不过Google内部实现了一套分布式文件存储系统来管理这些硬盘上的数据,并通过数据冗余作为在不可靠的硬件上实现可用性和可靠性的手段。 - 用户向调度系统提交一组任务,每个任务包含多个子任务,调度系统会为每个任务分配一批集群内的机器执行。
执行概览
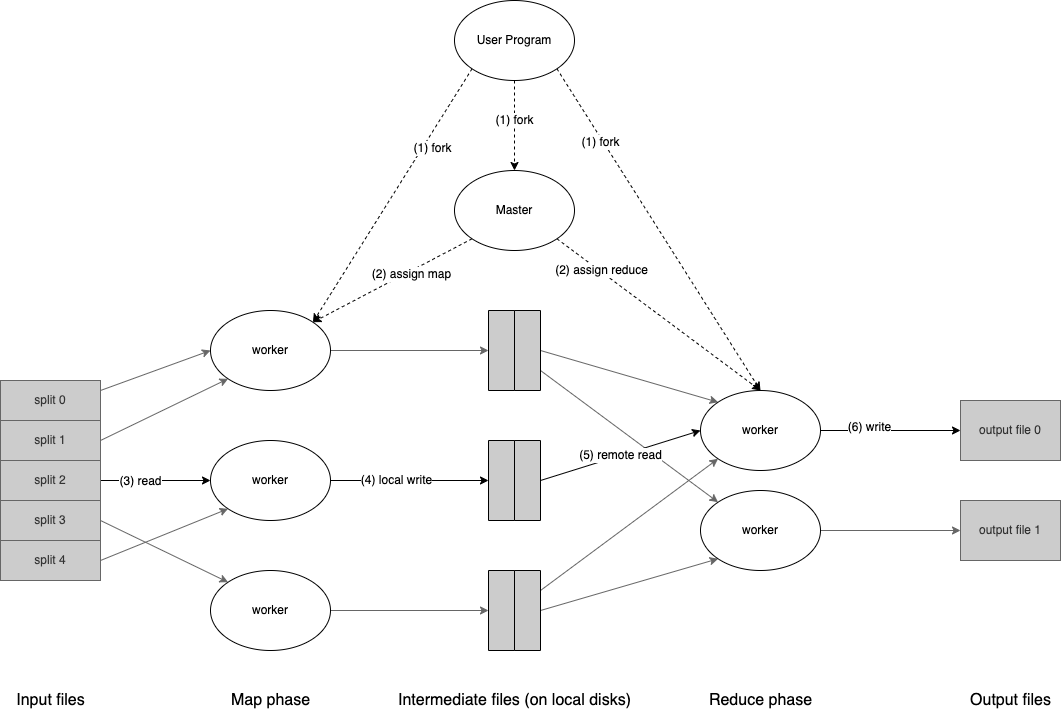
在 map 执行阶段,框架会自动将输入数据分为 M 片,从而将 map 任务分发到多台机器上并行执行,每台机器只处理某一片的数据。同样的,在 reduce 阶段,框架首先将中间结果数据根据分片函数(例如 hash(key) mod R)拆分为 R 片,然后分发给 reduce 任务执行,用户可自行指定 R 的值和实现具体的分片函数。
下图展示了 Google 所实现的 MapReduce 框架的整体执行流程:

当用户提交 MapReduce 任务后,框架会执行以下一系列流程(下文中的序号和上图中的序号对应):
- 首先
MapReduce框架将输入数据分为M片,每片数据大小一般为16 MB至64 MB(具体大小可由用户入参控制),然后将MapReduce程序复制到集群中的一批机器上运行。 - 在所有的程序拷贝中,某台机器上的程序会成为主节点(
master),其余称为工作节点(worker),由主节点向工作节点分派任务,一共有M个map任务和R个reduce任务需要分派。主节点会选择空闲的工作节点分派map或reduce任务。 - 如果某个工作节点被分派了
map任务则会读取当前的数据分片,然后将输入数据解析为一组键值对后传递给用户自定义的map函数执行。map函数产生的中间结果键值对会暂存在内存中。 - 暂存在内存中的中间结果键值对会周期性的写入到本地磁盘中,并根据某个分片函数将这些数据写入到本地磁盘下的
R个区,这样相同键的中间结果数据在不同的map节点下属于同一个区号,就可以在后续将同一个键的中间结果数据全部发给同一个reduce节点。同时,这些数据写入后的地址会回传给master节点,master节点会将这些数据的地址发送给相应的reduce节点。 - 当
reduce节点接收到master节点发送的中间结果数据地址通知后,将通过RPC请求根据数据地址读取map节点生成的数据。在所有中间结果数据都读取完成后,reduce节点会先将所有中间结果数据按照键进行排序,这样所有键相同的数据就聚合在了一起。之所以要排序是因为一个reduce节点会分发处理多个键下的中间结果数据。如果中间结果数据量太大不足以完全载入内存,则需要使用外部排序。 reduce节点执行时会先遍历排序后的中间结果数据,每遇到一个新的键就会将该键及其对应的所有中间结果数据传递给用户自定义的reduce函数执行。reduce函数执行的结果数据会追加到当前reduce节点的最终输出文件里。- 当所有
map任务和reduce任务都执行完成后,master节点会唤醒用户程序,并将控制权交还给用户代码。
当成功结束 MapReduce 任务后,其执行结果就保存在了 R 个文件中(每个文件对应一个 reduce 节点的产出,文件的名字由用户所指定)。一般来说,用户不必将这 R 个输出文件合并成一个,它们通常会作为另一个 MapReduce 任务的输入,或交由其他分布式应用处理。
基于上述流程,再来看在 编程模型 这节中的例子。假设有6个文档,分别是 1.txt 到 6.txt,每个文档中的内容为:
1 | 1.txt: |
对应 MapReduce 执行流程为:
- 我们假设每两个文档的数据大小为
16 MB,则6个文档对应3片数据 - 由1所知一共有3个
map任务,不妨将reduce任务也设为3个,并将6个文档按顺序每两个一组依次分发给每个map节点 - 每个
map节点处理的数据分片为两个文档,所产生的中间结果数据分别为:1
2
3
4
5
6
7
8
9
10
11
12
13
14
15
16
17
18
19
20
21
22
23
24
25
26
27
28
29
30
31
32
33
34
35
36
37
38
39
40
41map worker 1:
it 1
was 1
the 1
best 1
of 1
times 1
it 1
was 1
the 1
worst 1
of 1
times 1
map worker 2:
it 1
was 1
the 1
age 1
of 1
wisdom 1
it 1
was 1
the 1
age 1
of 1
foolishness 1
map worker 3:
it 1
was 1
the 1
epoch 1
of 1
belief 1
it 1
was 1
the 1
epoch 1
of 1
incredulity 1 - 在每个
map节点上将中间结果数据按照某个哈希函数分发到3个区,不妨为以下结果:1
2
3
4
5
6
7
8
9
10
11
12
13
14
15
16
17
18
19
20
21
22
23
24
25
26
27
28
29
30
31
32
33
34
35
36
37
38
39
40
41
42
43
44
45
46
47
48
49
50
51
52
53
54
55
56map worker 1:
region 1:
it 1
best 1
it 1
region 2:
was 1
of 1
was 1
worst 1
of 1
region 3:
the 1
times 1
the 1
times 1
map worker 2:
region 1:
it 1
age 1
it 1
age 1
foolishness 1
region 2:
was 1
of 1
of 1
wisdom 1
was 1
region 3:
the 1
the 1
map worker 3:
region 1:
it 1
epoch 1
belief 1
it 1
epoch 1
region 2:
was 1
of 1
was 1
of 1
region 3:
the 1
the 1
incredulity 1 reduce节点按照数据分区接收到所有中间结果数据后将其按照键排序:1
2
3
4
5
6
7
8
9
10
11
12
13
14
15
16
17
18
19
20
21
22
23
24
25
26
27
28
29
30
31
32
33
34
35
36
37
38
39
40
41reduce worker 1:
age 1
age 1
belief 1
best 1
epoch 1
epoch 1
foolishness 1
it 1
it 1
it 1
it 1
it 1
it 1
reduce worker 2:
of 1
of 1
of 1
of 1
of 1
of 1
was 1
was 1
was 1
was 1
was 1
was 1
wisdom 1
worst 1
reduce worker 3:
incredulity 1
the 1
the 1
the 1
the 1
the 1
the 1
times 1
times 1reduce节点调用用户自定义reduce函数计算单词出现次数,最终每个reduce节点的输出文件为:1
2
3
4
5
6
7
8
9
10
11
12
13
14
15
16
17
18reduce worker 1 output:
age 2
belief 1
best 1
epoch 2
foolishness 1
it 6
reduce worker 2 output:
of 6
was 6
wisdom 1
worst 1
reduce worker 3 output:
incredulity 1
the 6
times 2- 将代码控制权交还给用户代码
Master 节点数据结构
master 节点需要维护当前所有的 map 和 reduce 任务,每个任务需区分不同的状态(空闲、进行中、完成),同时还需要知道每个任务对应的工作节点。作为 map 节点和 reduce 节点间中间结果数据的传输媒介,master 节点需保存 R 个中间结果分区,每当一个 map 节点执行成功时,会将生成的 R 个中间结果文件地址发送给 master 节点,当 master 节点收到通知后,会将其转发给对应进行中的 reduce 节点。
对应数据结构简单示例如下:
1 | // 任务状态 |
容错
因为 MapReduce 框架借助几百或几千台机器来处理海量数据,所以必须优雅的应对机器异常。
工作节点异常
master 节点会周期性的对工作节点进行探活。如果某个工作节点在一段时间内无响应,则 master 节点会将该工作节点标记为异常。该工作节点完成的所有 map 任务的状态都会被重置为空闲,可重新被 master 节点调度到其他工作节点上执行。类似的,该工作节点所有进行中的 map 或 reduce 任务也都会被重置为空闲,并重新接受调度。
之所以这里已完成的 map 任务也需要重新执行是因为所产生的中间结果文件是保存在 map 节点的本地磁盘上,当该节点无响应时便认为无法与之连通从而认为无法通过 RPC 请求获取这些数据。而如果 reduce 节点异常,它所完成的 reduce 任务不需要重新执行是因为 reduce 节点执行成功后产生的输出文件是保存在全局的文件系统上。
如果某个 map 任务一开始由工作节点 A 执行,之后由工作节点 B 执行(因为节点 A 发生了异常),则所有执行 reduce 任务的节点都会被通知,其中所有要从节点 A 读取数据但还未读取的 reduce 节点会转而从节点 B 读取数据。
MapReduce 框架能从容应对大量的节点异常。例如,在某次 MapReduce 任务中,由于对运行中的集群进行网络维护一次性造成了80台机器在几分钟内无法连通。MapReduce 框架可直接重新分发和执行这些不连通的节点正在处理的任务,然后继续后续流程,并最终完成当次任务。
主节点异常
类似于游戏的自动存档,我们可以定期为主节点内部的数据结构保存检查点。如果主节点发生异常,则可以重新启动一个主节点程序并加载最新的检查点数据。然而对于单个主节点来说,主节点异常发生的概率较小,所以在 Google 的实现中,如果主节点发生异常,则会直接中断当次 MapReduce 任务。客户端可捕获到这种情况,并根据自身需要决定是否进行重试。
执行语义
如果用户编写的 map 和 reduce 函数是确定性的函数(即对于相同的输入始终返回相同的输出),则对于同一份输入,分布式的 MapReduce 框架的执行结果和一个串行执行且没有任何异常的 MapReduce 框架的执行结果相同。
不论是 map 还是 task 任务,都需要将执行结果写入到文件系统上,通过原子性的写入提交,可实现上述的语义保证。每个进行中的任务会先将输出结果写入到私有临时文件中,对 reduce 任务来说,最终只产生一个文件,而对于 map 任务则会产生 R 个文件(每个文件对应一个 reduce 任务)。当一个 map 任务执行完成时,map 节点会发送一条消息给 master 节点,这条消息中包含了 map 任务所生成的 R 个临时文件的名字。如果 master 节点收到了一条已经完成的 map 任务的消息,则会忽略该消息,否则将 R 个临时文件的名字保存在内部的数据结构中。
当 reduce 任务执行完成时,reduce 节点能原子性的将其生成的临时文件重命名为最终的输出文件。如果同一个 reduce 任务有多个工作节点执行(因为网络连通问题导致 master 重新分发 reduce 任务),则对同一个最终输出文件会有多个文件重命名的请求。通过底层文件系统的原子性重命名保证,最终的输出文件只会对应一个 reduce 任务的结果。
在 Google 内部大部分的 map 和 reduce 函数都是确定性的,在这种情况下分布式程序执行的结果和串行程序执行的结果相同的语义性保证使得开发人员能很容易的审视所编写的程序的行为(即如果程序的执行结果不符合预期,那么可以基本肯定的是开发人员编写的 map 或者 reduce 函数存在问题,而不是 MapReduce 框架存在问题)。当 map 或者 reduce 函数不具有确定性时,框架能提供稍弱一级但仍是合理的语义性保证。在非确定性的函数下,某个 reduce 任务 R1 由分布式执行的结果等价于一个串行执行的程序 A 执行 R1 后的结果。但是,另一个 reduce 任务 R2 的执行结果也可能等同于由另一个不同的串行执行的程序 B 执行后的结果。
假设有一个 map 任务 M,以及总共有两个 reduce 任务 R1 和 R2,记 e(Ri) 表示 Ri 执行并提交成功的结果。以前面的单词统计为例,假设发送给 map 任务的只有两个文档:
1 | 1.txt: |
在 map 函数是非确定性的情况下,不妨这样实现 map 函数:
1 | map(String key, String value): |
即对于某个单词,map 函数有一半的概率计数为1,一半的概率计数为0。
类似的,以同样的手段来实现 reduce 函数,对于某个单词的所有出现次数,reduce 函数有一半的概率会计数,一半的概率会忽略:
1 | reduce(String key, Iterator values): |
令 R1 为统计单词 it 的个数,经过 map 任务后,生成的中间结果键值对可能为以下四种情况:
- [0, 1]
- [1, 0]
- [1, 1]
- [0, 0]
最后由 reduce 任务执行后的结果可能为0、1、2三种情况,而相同的输入由一个串行执行的程序来执行也是同样的结果,即不管是分布式的程序还是串行的程序最终结果都是相同的集合,所以认为两者是等价的,也是合理的。
在确定性的函数下,相同的输入必然返回相同的输出,而在不确定性的函数下,不同的输入可能返回相同的输出或者相同的输入可能返回不同的输出。这就类似于知道 x 的定义域是 {1, 2, 3},y 值域是 {4, 5, 6},求 f(x),显然 f(x) 存在不止唯一的解。
记上述的 map 和 reduce 函数组成的串行程序为 A,假设有另一个串行程序 B,其中 map 函数不变,reduce 函数变为:
1 | reduce(String key, Iterator values): |
令 R2 为统计单词 was 的个数,由 A 或 B 执行的最终结果都等于集合 {0, 1, 2},相比于确定性的函数,开发人员因此无法有效的审视所编写函数的行为。
局部性
在 Google 内部的运行环境中网络带宽属于稀缺资源,不管是 map 还是 reduce 任务都依托于文件的读取,不可避免的会产生大量网络 IO。而在前面提到,Google 内部实现了一套分布式文件存储系统(GFS)来管理存储在集群内机器本地磁盘上的文件,对于每一个文件 GFS 会将其切分为若干个 64MB 的数据块,每个数据块存有多份冗余(一般是3份)保存在不同的机器上。对于 MapReduce 框架来说,原始的数据输入是保存在本地磁盘上的,依据这个特性,框架在分发 map 任务时,根据输入数据在 GFS 内的位置会优先选择本地磁盘上存有对应输入数据的工作节点。如果找不到这样的工作节点,则会选择一个距离输入数据最近的工作节点(例如工作节点和存有输入数据的节点由同一个交换机相连)。当运行大量的 MapReduce 任务时,大部分的输入数据都是从本地读取从而不消耗任何网络带宽。
任务粒度
如前文所述 MapReduce 框架会根据输入数据拆分为 M 个 map 任务和 R 个 reduce 任务。理想情况下,M 和 R 的值应该远大于工作节点的数量。为什么需要远大于?首先,M 和 R 的数量比工作节点的数量少是不适合的,会造成资源空闲;其次,如果 M 和 R 的数量和工作节点相等,由于每台机器的处理能力有差异或者输入数据不同,每个工作节点完成某个任务需要的时间也不同,会存在部分机器先完成任务的情况,同样会造成资源空闲,另一方面 MapReduce 面向的是大数据处理,输入数据的数据量远大于工作节点的数量,M 和 R 数量较少的情况下单个工作节点需要处理的数据量则较大,单次处理时间可能较慢,而如果发生了异常,重新执行的成本也较高。所以 M 和 R 的数量设置较大能更好的应对负载均衡,性能好的机器在完成任务后可以继续处理其他任务,同时当某个任务执行异常时也能更快的恢复:该异常的工作节点已完成的 map 任务可分发给余下的工作节点执行。
当然 M 和 R 的数量也是存在上限的,对于 master 节点来说,它需要维护 M 个 map 任务和 R 个 reduce 任务,时间复杂度是 O(M + R),另一方面每个 map 任务会产出 R 份中间结果数据,对应 R 个 reduce 任务,所以 master 节点也需要 O(M * R) 的空间复杂度来维护这样的对应关系(Google 实际实现时,每个 map/reduce 关系对约占据 1 byte 内存)。
另外,由于每个 reduce 任务的最终产出结果是一个单独的文件所以 R 的数量受用户设置限制。在实践中,会趋向于让每个 map 任务处理 16 MB 到 64 MB 的输入数据来确定 M 的大小,因为 64 MB 正好是 GFS 单个数据块的大小,这样每个 map 任务必然能从本地磁盘读取输入数据而不会涉及网络 IO(如果能将任务分发给存有对应输入数据的节点的话),而 R 的数量会在工作节点的数量上乘上一个较小的常数得到。Google 内部运行 MapReduce 任务时通常设置 M 为200000,使用2000台机器的情况下设置 R 为5000。
后备任务
类似于木桶原理,一次 MapReduce 任务完成的时间取决于最慢的机器完成 map 或 reduce 任务的时间,这也是造成 MapReduce 任务耗时长的常见原因之一。某台机器执行慢可能有好几个原因造成,例如某台机器的磁盘存在异常,可能频繁遭遇可校正的异常,从而使得磁盘的读速度从 30 MB/s 降低到 1 MB/s。而调度系统同时有可能分配了其他的任务给这台机器,会进一步引发 CPU、内存、本地磁盘、网络带宽的竞争,从而造成执行 MapReduce 任务的耗时更长。Google 内部曾经遇到一个问题,由于机器初始化代码中的一个 bug 造成处理器的缓存被禁用,在这些受影响的机器上运行的任务耗时增长了超过100倍。
针对这个问题,Google 提出了一个通用的缓解机制。当一次 MapReduce 任务快执行结束时,框架会将剩余还在进行中的任务分配给其他机器执行。不管是原先分配的机器执行完成,还是新分配的机器执行完成,对应的任务都将标记为完成。让一个任务由两台机器同时执行势必存在资源浪费,Google 通过调优使得耗费的计算资源控制在了增加几个百分比以内。这个机制在处理一个数据量巨大的 MapReduce 任务时能大幅降低整体耗时。在某个约需处理 1T 数据的排序任务中,不启用这个机制的情况下整体耗时会增加44%。
改进
大多数情况下用户仅需编写 map 和 reduce 函数就能满足需求,本节主要描述一些 MapReduce 的扩展,可能在某些场合下会比较有用。
分片函数
用户可指定 MapReduce 任务最终输出文件的数量 R,也即 reduce 任务的数量。那么由 map 任务产生的中间结果数据应该发给哪个 reduce 节点执行呢?这个就交由分片函数决定,默认的分片函数是哈希函数(例如 hash(key) mod R),这种分片结果一般比较均匀。不过,有时候自定义分片函数会更有用,例如,当最终结果文件的键是 URL 时,我们希望同属于一个 host 下的 URL 对应的数据最终都在同一个文件里,用户可自定义分片函数来实现,例如 hash(Hostname(urlkey)) mod R,即先通过 urlkey 提取 host,然后对 host 计算哈希最后取模 R。
顺序保证
MapReduce 框架保证在同一个中间结果分区内,即同一个 reduce 任务内,中间结果数据是按照键的升序处理的,因为 reduce 任务处理前会先将中间结果数据按照键进行排序。这样在 reduce 任务处理完成后,最终结果文件内的数据也是按照键的顺序排序的,这就有利于对最终结果文件按键进行高效的随机查找,或方便其他需要排好序的数据的场景。
合并函数
在某些场景下,map 任务产生的中间结果数据的键存在大量的重复,同时用户编写的 reduce 函数又符合交换律和结合律(即 a + b = b + a,(a + b) + c = a + (b + c))。一个典型案例就是前文描述的单词计数程序,每个 map 任务都会产生成百上千的形如 <the, 1> 的中间结果数据,其中 the 指某个单词,1表示该单词出现的次数。这些同键的中间结果数据接着会经过网络传输发送给 reduce 任务,然后由 reduce 函数合并相加。为了减少这种雷同数据的网络传输,用户可编写自定义的合并函数,map 任务在生成中间结果数据前先进行同键的合并,从而将原来成百上千的同键网络传输降低为1次。
一般来说,合并函数和 reduce 函数的用户代码实现是相同的。不同在于 MapReduce 框架如何处理这两个函数产出的结果,reduce 函数的产出结果会写到最终的结果文件里,而合并函数的产出结果会写到中间结果文件里,然后发送给 reduce 任务。
在特定情况下,由于省去了大量的网络 IO,合并函数能显著的降低一次 MapReduce 任务执行的耗时。
输入和输出类型
MapReduce 框架支持从多个数据格式读取输入数据。例如,text 模式下将输入数据的每一行作为键值对,其中键通过在文本中的偏移量来确定,而值就是当前行的内容。另一种通用支持的格式是本身保存了已排好序的键值对。不管是哪种输入格式,MapReduce 都能从原始输入中准确切分出键值对供 map 任务使用(例如 text 模式保证以每一行的结束进行切分)。用户也可实现自定义的 reader 接口来支持读取新的输入格式,不过大部分情况下内置的输入格式已经能满足需求。
虽然前文描述过 MapReduce 的原始输入数据来源于文本文件,不过用户自定义的 reader 接口并不一定要从文本文件读取,例如还可以从数据库或内存中读取。
类似的,MapReduce 框架也支持不同的最终输出数据的格式,用户也同样可实现支持自定义的输出格式。
副作用
在某些情况下,用户可能希望在 map 或 reduce 阶段生成额外的辅助文件,这就要求开发人员自己保证输出文件的原子性和幂等性,特别是用户程序先将数据写入到临时文件内,最后在所有数据写入完成后能原子性的将临时文件重命名。
不过,MapReduce 框架本身并不支持两阶段协议来保证 map 或 reduce 任务输出多个文件时的一致性,同样的,这也需要开发人员自己来保证。因此多文件一致性对应的任务应当是确定性的,否则如何确定产出的文件是符合一致性的?而在实践中要求任务是确定性的并不是个问题。
忽略异常数据
有时候由于用户编写的 map 或 reduce 函数存在 bug,导致处理某些数据时 map 或 reduce 函数必然发生异常,这就造成 MapReduce 任务无法正常完成。正常来说应当修复 bug,但有时候不可行,例如造成 bug 的代码可能是第三方库引入的。另一方面,有时候忽略这些造成异常的数据也是可以接受的,例如在对一个数据量非常庞大的数据集做统计分析时。因此,MapReduce 框架提供了一种可选的执行模式,当其检测到某些输入数据必然造成异常时,则会跳过这些数据从而使得执行流程能继续走下去。
为了实现这个功能,首先每个工作节点上都安装了一个 signal handler 程序用于捕获段异常和总线异常。在执行 map 或 reduce 任务之前,MapReduce 框架首先将当前任务需要的输入数据所对应的序号保存在工作节点内的一个全局变量中,在执行 map 或 reduce 任务时,如果用户代码发生异常,此时 signal handler 能捕获到相应的异常信号,然后 signal handler 会发送一个 UDP 数据包给主节点,该数据包中包含了执行当次任务的输入数据序号。如果主节点发现某个数据对应的任务执行失败了多次,则会忽略该数据而不是重新执行 map 或 reduce 任务。按照这样的描述,被忽略的数据是数据片维度,而不是键值对维度,因为每片的数据块大小相比于总数据量的大小来说微乎其微,所以整体影响不大。
本地执行
调试分布式程序并不是件简单的事,对于 MapReduce 任务来说,一次任务会被分发到几千台机器上执行,每台机器实际执行的任务也无法预测。为了方便调试、性能分析和小规模测试,Google 实现的 MapReduce 框架也提供了一个串行执行的版本,能在单台机器上串行执行所有任务。同时,用户也可通过参数控制一次 MapReduce 任务只执行些特定的 map 任务。通过在启动程序时指定调试参数,用户就可轻松的使用调试或测试工具(如 gdb)对编写的程序进行调试和测试。
状态信息
主节点内部同时运行了一个 HTTP 服务,用于提供给用户查看一系列状态信息。状态信息页面展示了当前任务的进度,例如有多少个任务已经完成,有多少个任务正在进行中,输入数据的大小,中间结果数据的大小,最终结果数据的大小,任务处理百分比等。同时,状态页面也提供了每个任务执行产生的标准错误输出和标准输出文件。用户可根据这些信息来预测任务需要多久才能完成,以及是否需要添加更多的计算资源。状态页面也可用于判断当前任务执行耗时是否比预期的长。
此外,状态页面也显示了失败的工作节点,以及这些失败的工作节点对应的 map 或 reduce 任务。这有助于用户排查编写的代码中是否有 bug。
计数器
MapReduce 框架内部提供了一个计数器用于统计各个事件发生的次数。例如,用户可能希望统计一次任务中一共处理了多少个单词,或者有多少个德语文档建立了索引。
如果要开启这个功能,用户需要编写一个命名计数器,然后在 map 或 reduce 函数中在需要的时候对计数器自增,例如:
1 | Counter* uppercase; |
每个工作节点上的计数器的值会周期性的发送给主节点(如前文所述,主节点会周期性的对工作节点进行心跳探测,工作节点会在响应结果中带上计数器的值)。主节点会对执行成功的 map 和 reduce 任务返回的计数器聚合,当整个 MapReduce 任务完成将控制权交还给用户代码时,用户代码可获取到创建的计数器的值。当前的计数器的值也同样会展示在状态页面,用户也可根据此信息来观测整个任务的进展。在对计数器聚合时,和主节点会忽略已完成的某个任务的重复通知一样,主节点同样会忽略某个来自已完成任务的计数器更新,从而避免重复计数(任务的重复执行主要有两种情况,一种是由于网络不连通,导致主节点重新分配某个 map 或 reduce 任务到新的工作节点上;另一种是触发了后备任务,主节点主动分发同一个 map 或 reduce 任务给多个工作节点执行)。
MapRecue 框架本身也维护了一些计数器,例如已处理的输入数据键值对的数量,以及已生成的最终数据键值对的数量。
用户能很方便的通过计数器来检查 MapReduce 任务的行为。例如,在任务执行时用户可通过计数器来确保输出的键值对数量是否等于输入的键值对数量,或者已处理的德语文档的数量在全部已处理的文档数量中的占比是否符合预期。
性能
这一节主要描述 MapReduce 在 Google 内部环境下运行的性能情况,这里不再赘述。简单举例来说,在1800台机器上执行一个 10T 数据量的分布式 grep 搜索耗时约150秒。
总结
最后,来自 Google 的总结:
- 限制性的编程模型使得计算并行化变得容易,以及有着较好的容错性,这也体现了计算机领域的一个重要思想:抽象
- 对于大型系统来说,网络
IO容易成为瓶颈 - 冗余执行可以作为有效降低成为性能短板的机器带来的影响的手段,另外冗余也是应对机器异常、数据丢失的方式


